Ryan Hewitt offers up some creative reverb techniques in this excerpt from his video “Ryan Hewitt Mixing the Lumineers.” He combines three different reverbs — two stereo and one mono, all on aux busses—to create a big sounding vocal ambience that starts with a stereo bloom and then finishes up mono. He explains that it also gives him the option to use mono reverb on the vocal in one part of the song, and stereo in another.
THREE PLATES
Hewitt’s layered reverb setting starts with an instance of UAD’s stellar EMT 140 plate reverb on a mono aux track. This plug-in can be set to one of three different plate emulations: A, B, or C. For this one he selects plate A, which he says is his favorite of the three. He sets the Reverberation Time (decay time) to just above three seconds. (For the sake of this article, we’ll refer to this one as “Reverb 1.”)
Because he’s configuring the reverb in his session as a bus effect, he leaves the Wet/Dry Mix at its 100-percent-wet default setting. He also sets the Input Filter (which is a shelf filter designed to reduce low-frequency content from the reverberated signal) to 180 Hz. Why remove low end? The low frequencies can muddy up the sound and are not usually necessary to achieve a good-sounding reverb effect.
The other key parameter is Pre-Delay. Hewitt sets it to approximately 100ms. The Pre-Delay setting is critical to how this reverb interacts with the other ones (you can read more about pre-delay in the Puremix article Mixing with Indirect Mics, Featuring Chris Lord Alge).
The second reverb (which we’ll call, “Reverb 2”) is another instance of the UAD EMT 140, this time on a stereo aux track. Hewitt sets it to Plate B with a Reverberation Time of a little below three seconds, the Input Filter at 250 Hz and the Pre-Delay at about 25ms. All the other settings remain at their defaults.
The difference in Pre-Delay times between this reverb and the mono reverb is one of the keys to Hewitt’s multiple-reverb effect. The stereo Reverb 2 will start about 75ms before the mono Reverb 1, so you’ll hear the sides first and then the center.
The third reverb (“Reverb 3”), yet another instance of the EMT 140, is also on a stereo aux track. This time Hewitt chooses plate C with a 180Hz setting on the Input Filter, a Reverberation Time of just over two seconds and a relatively short Pre-Delay setting of 25ms. On this aux bus, he also inserts Air Stereo Width plug-in to widen out the reverb effect and also adds a FabFilter Pro-Q equalizer plug-in with a roll off of the bottom end below about 80Hz.
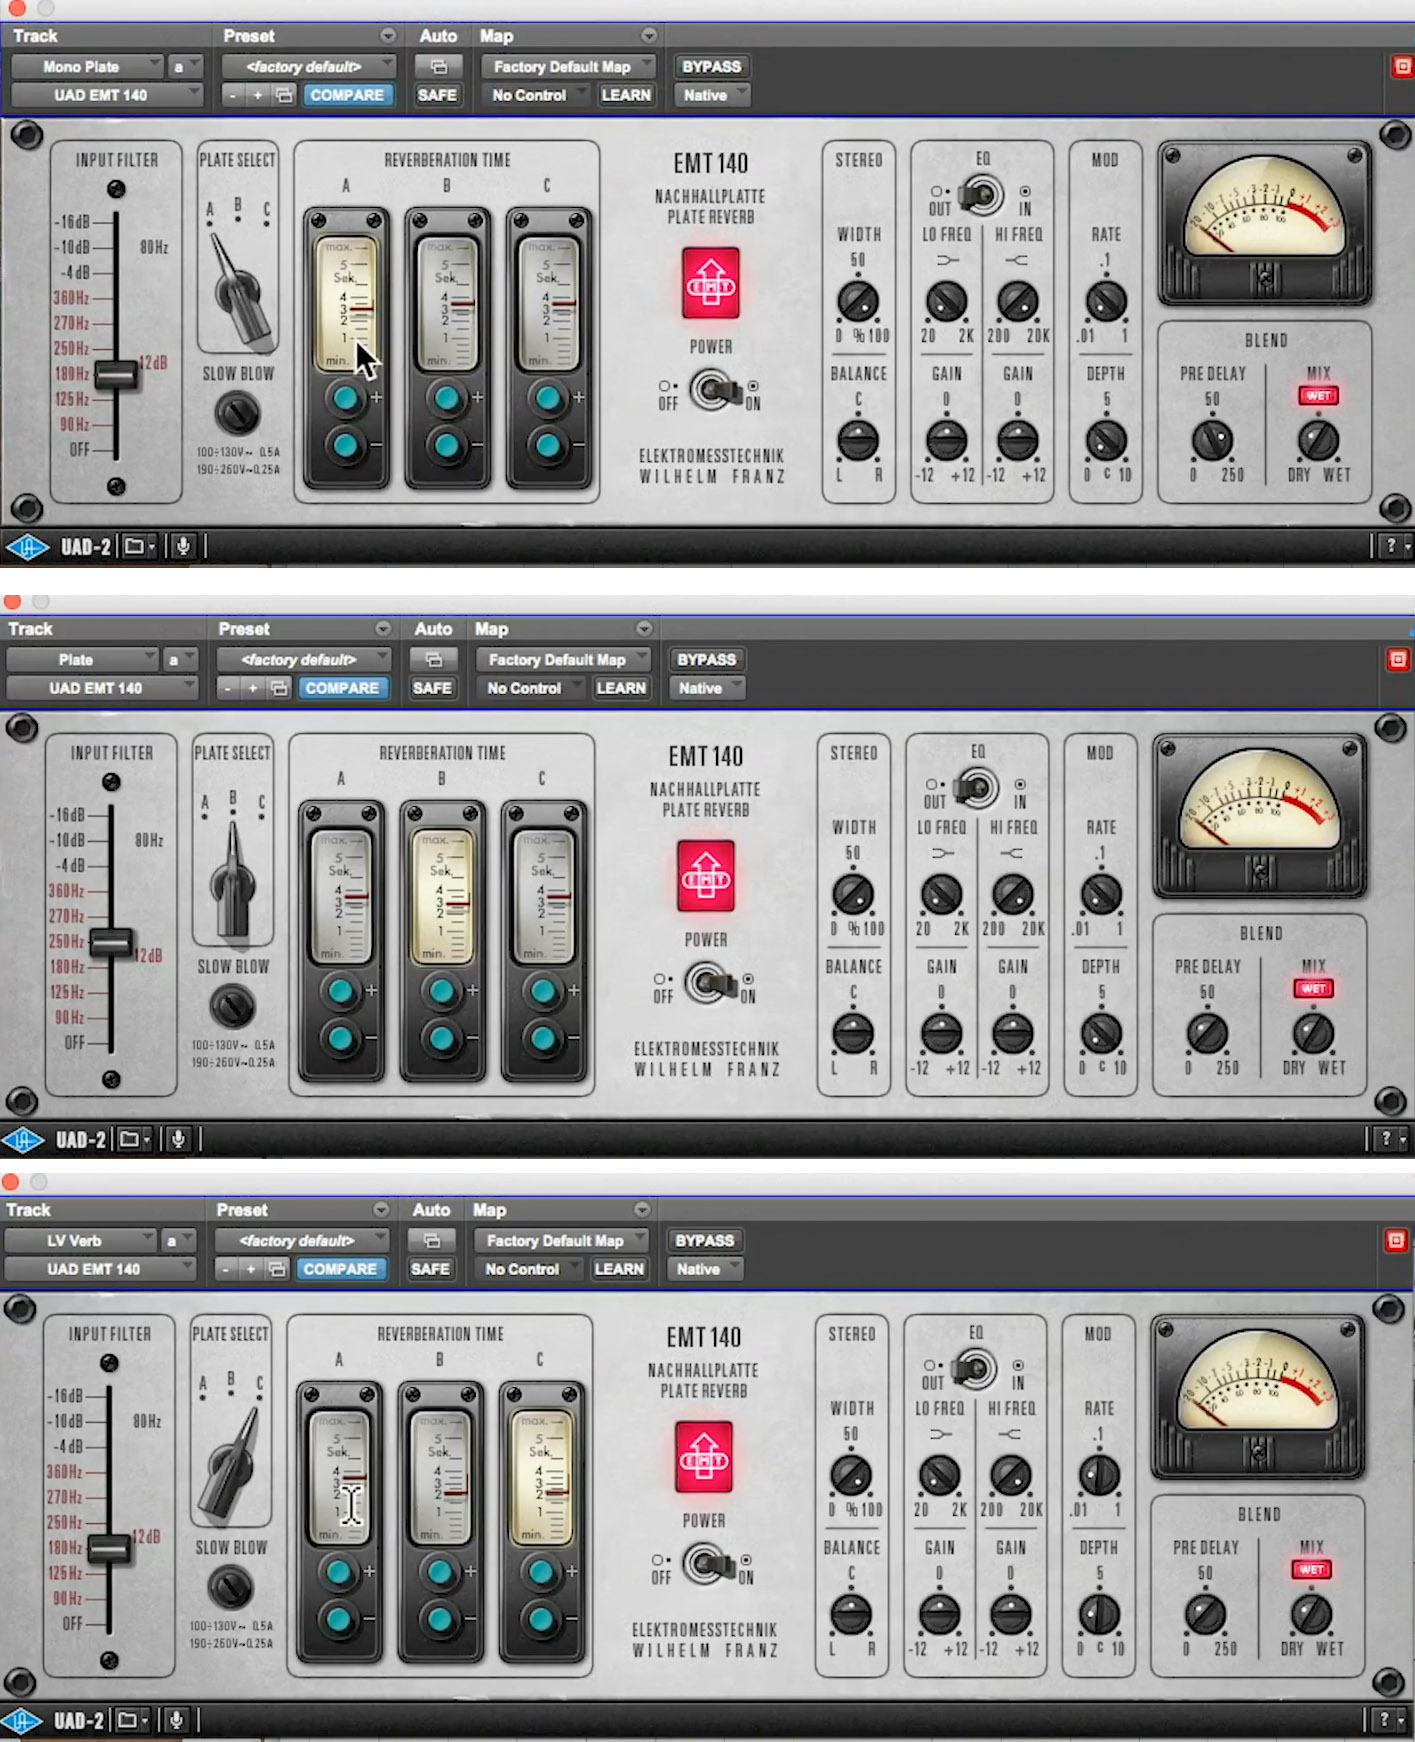
Here are the three reverb settings Hewitt uses. From top to bottom you see the mono reverb followed by the two stereo instances. Compare decay and Pre-Delay times between the three to get a sense of how this effect will develop over time.
Let’s review what he’s doing here. He’s got three reverbs, one mono (Reverb 1) and two stereo (Reverbs 2 and 3). The two stereo reverbs both have the same, 25-second Pre-Delay setting, so you'll hear their effect first. Because Reverb 3 has the Stereo Width plug-in on it, it will be out to the sides a little bit more than Reverb 2. After 75ms, corresponding to its Pre-Delay settings, the mono reverb (Reverb 1) will kick in. And for a while, all three will be audible. Reverb 3, which has the shortest Reverberation Time will drop out first, followed by Reverb 2, and the last thing you’ll hear is the mono reverb.
The cumulative effect of all three reverbs together is that they sound like one big, rich, complex ambience. This kind of effect is particularly useful on songs with slow tempos, like the intro of this song that you hear in the video. A long reverb on a fast song can create muddiness because it doesn’t decay fast enough to keep up with the rhythm. As a result, the reverb decays of notes tend to hang over the subsequent ones causing a cluttered sound.
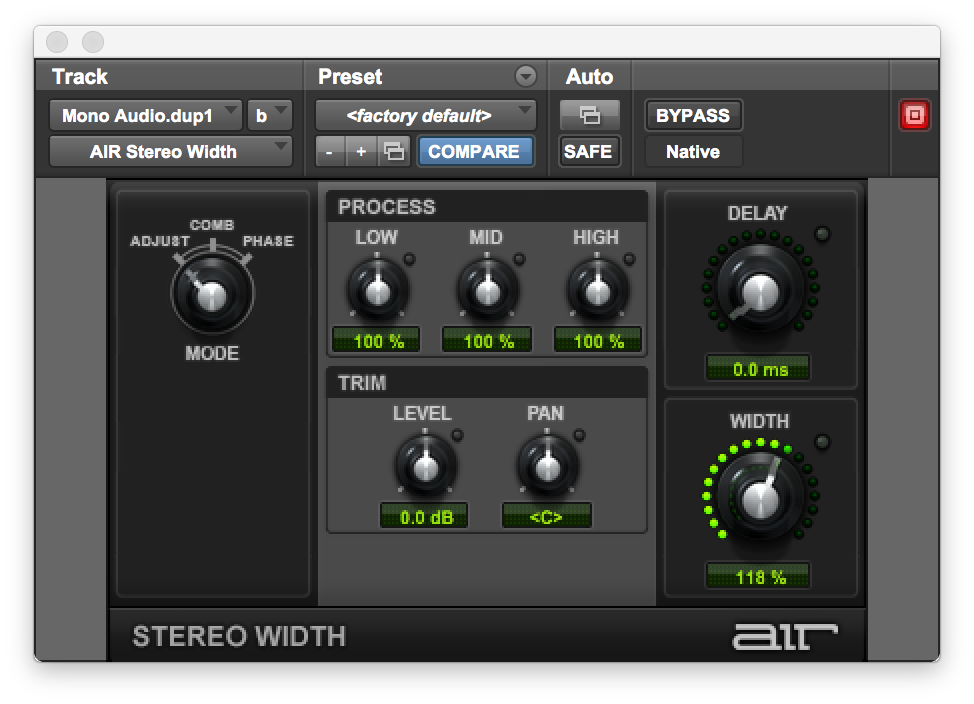
Hewitt uses the Air Stereo Width plug-in to widen out one of the stereo reverbs on the vocal, creating more contrast with the mono reverb.
MONO VS. STEREO
Here are a couple of audio examples, using the same EMT 140 plug-in and settings as Hewitt, which will help illustrate the roles that the various reverbs play in creating a thick, composite sound when they’re used together. You’ll be able to hear the differences between the various reverbs better if you listen with headphones or earbuds. (Note that a different stereo widener, IK Multimedia Quad Image, was used instead of Air Stereo Width and a different EQ, Logic’s Channel EQ, replaced the FabFilter Q2.)
EXAMPLE 1: This features a short vocal passage that repeats four times. The first time it’s dry, the second time it has Reverb 1 (mono) only, the third time Reverb 1 and 2, and the third time Reverbs 1, 2 and 3.
EXAMPLE 2: This features a snare drum hitting a total of eight beats. On beats one and two, all three reverbs are on. On beats three and four, Reverb 1 (the mono reverb) is turned off. On beats five and six Reverb 1 is added back in. On beats seven and eight, only Reverb 1 is active. Note that when the mono reverb is off, the image is more to the sides and not as thick in the center, but when all three are together it feels like one, complex, wide reverb.
TAKEAWAY
What the Hewitt technique illustrates is that by combining reverbs with differing time elements (decay time and pre-delay), you can create composite effects that not only sound rich, but change over time. Although he used three instances of the same reverb plug-in, you don’t have to do it that way. You can experiment with different reverb plug-ins (or different reverb types such as hall, plate, etc.). You also don’t necessarily need three different instances, two will also work.
You might try inverting what Hewitt did and give the stereo reverb (or reverbs) a longer pre-delay and decay time and the mono reverb shorter ones. In that case, the reverb would start in the center and then bloom on the outsides. The possibilities are endless.