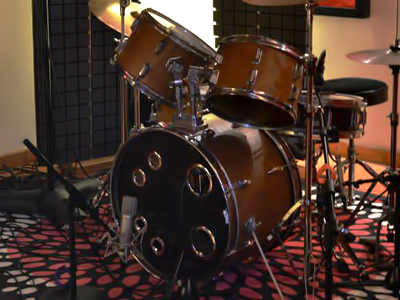
Using samples to enhance drum tracks is common practice in more music genres than you would imagine. Whether your audience is dressed up for an electro night or is showing off spiked bracelets and black leather jackets, some of the music it listens to will contain such mixing technique, without anyone noticing.
 And there is no reason why they should, because no matter how coveted this technique is, it has nothing to do with cheating or avoiding using expensive microphones and preamps. Since what matters in the end is the final sound of your record, drum triggering and sample enhancements can be exactly what you need to avoid endless chains of EQs and compressors that get you nowhere.
The reason why I wanted to write this article comes from the fact that in the last year I’ve seen this technique being used at an increasing pace, especially from artists and bands who decide to venture into self-producing their record. Half of the sessions I received in the last year featured a mixture of acoustic tracks and triggered samples for their rhythm section and pretty much all of them suffered from a number of problems that could have been avoided if the producers had followed some simple guidelines.
Gathered within this piece of virtual paper is a collection of hints that really helped me out in the years. My idea is to write it down as a sort of checklist so that you can keep it safely by your side whenever the S-word is said out loud in your control room (“S” for Samples..).
1 - Use MIDI, ditch MIDI
 As a pianist and keyboards player, I’ve been eating MIDI for breakfast (tastes terrible). Back then, MIDI was among “the” big things in music.. even now it is definitely amazing to use and it makes life easier in a number of situations but - to me - it is a nightmare in any mixing session. I understand I have become uber skeptical with the years because I now record my hardware synthesizers straight in audio with no regard of their MIDI capabilities. The reason for this is that, often times, what I recorded did not sound like what I had played. This is not the place and time to go into technical details but MIDI is known to get shaky, especially when a lot of data is being transferred (namely continuous controllers like volume pedals and breath controllers).
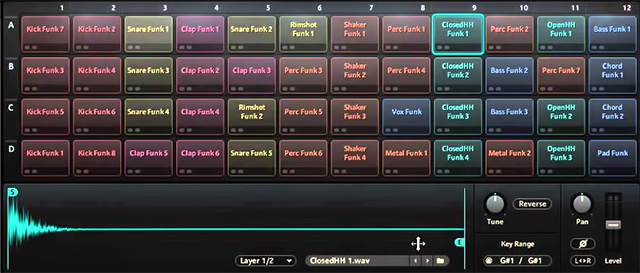
Drum triggering does not require boatloads of MIDI data but we all agree that removing unwanted variables is a big plus. Virtual instruments have always been the first and foremost reason for DAW crashes in my book, with their disk streaming, RAM buffering, multi-samples, built-in features, fancy interfaces etc. Moreover, they add dependencies to your session: not every sound engineer has the same exact sound libraries you have!
I would suggest you use all the MIDI you like during your production phase, because that is when you need to be able to take your ideas into reality in the shortest time possible. Then, when your track is produced, even if still not mix-ready, commit to your choices and print those samples.
The easiest way is to create a new audio track (mono or stereo depending on your needs) and then set its input to a bus, then route the output of your virtual instrument to that bus. Do this for each virtual instrument and you will be able to effectively print each one into a separate track, in one pass.
In case you don’t use a full-fledged sound library for your drum samples and instead use plugins that do real-time replacement, I would still recommend this step before heading into mixing. Reason being, again: it is good practice to lose any dependency in your session to make it easy to open by the mixing engineer, without risking weird error pop-ups (that might make you lose an entire session on the clock!).
2 - Double check the alignment
 So now that we are left with all audio tracks, we are moderately safe. We no longer have to worry about virtual instruments, MIDI interfaces, buffering, CPU spikes or audio gremlins but the journey in front of us is still going to take us into perilous wastelands.
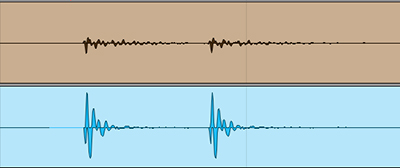
We know that the drum samples are now written in stone (aka in an audio file) but we have no information on how the trigger decided to place the sample itself. Since every hit from your drummer is different, there is no warranty the trigger will place your sample at the same exact position each time. Experienced producers and engineers learn to work with specific triggers and become accustomed to knowing their general behaviour. But since no one is born an expert, it is safer to double check.
Nothing beats just listening to your acoustic AND triggered tracks in solo. Let’s say you added two samples to your drum tracks: one for the bass drum and the other one for the snare. Put both kick and snare (with their sampled counterparts) in solo and listen to them:
- Does the kick sound “deep”, always in the same way? Does it lose its bottom in some parts (e.g. when the drummer plays more softly)?
- Does your snare sound snappy, every time? Does it have the same body?
- Do kicks and snare have occasional flams?
If you hear trouble, then trouble it is.
“But..it sounded fine when we decided on the samples, weeks ago!” Well, It is common practice to choose samples based on a specific part (like a chorus) and then forget to double check the entire session. A trigger or virtual instrument that “detects” fine in a chorus might lose it on a different part, like a softer breakdown.
Unwanted flams are clearly bad, as they introduce an artificial, super quick double hit that has no intended use for you. When differences in alignment get smaller, careful listening will reveal a change in the bottom or body of the instruments, caused by phase cancellation.
Personally, I am not satisfied by such result and the reason is simple: if I go through the hassle of adding something like triggered samples to my session, it better be good and behave exactly as I want to: there is no point in spending any time EQing and compressing a bass drum to get that perfect sound if the source itself changes in phase and character with every hit or section of the song.
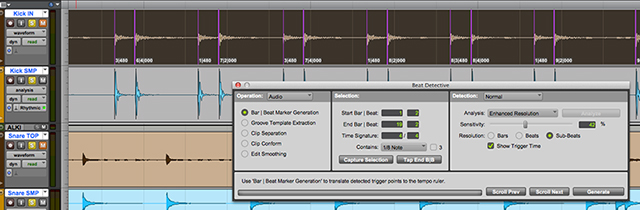
Luckily for us, today’s DAWs imply variations of Pro Tools “elastic time” concept, which allow us to easily conform one track to another.
3 - A little fine tuning goes a long way
At this point we have done our best: we have good-sounding drums, good samples, we like the relationship between the two, we made sure there is no main issue with our triggering. So we THINK we can start mixing..meaning we immediately get that urge to gate, high-pass, EQ and compress everything with the latest plugins in our arsenal (or hardware, if you are that kinda guy).
Learning to resist this urge, and instead focus on something else was for me one of the best personal improvements as a sound engineer, hands down. Instead of grabbing my favorite plugins, I now usually spend 5-10 minutes to focus on:
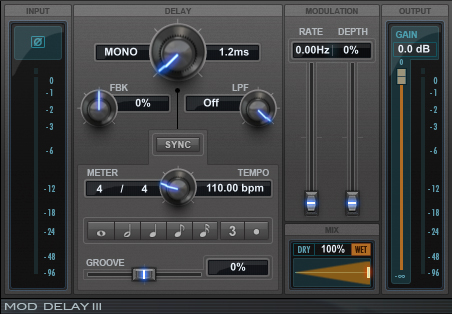 Time alignment: remember when we made sure all the samples are aligned to the original source in the same way? That was time well spent, because now we can create an offset with something like a very simple delay plug-in, set at 100% WET, no feedback or fancy stuff, just a delay in milliseconds (even better if in tenths of a millisecond!). Take the Kick Sample and start delaying it in small increments, even 1-2 milliseconds can be a lot! You might find a point where the two sounds are misaligned but generate a timbre that you like. Now you know you have a systematic misalignment that is constantly delivering the intended result, instead of just approximately having something “about there”. Your EQ will thank you!
Phase correlation: start flipping the phase on your samples..do you hear the bass drum becoming deeper at the bottom? Or thinner? Does it have a nasal sound? Does it lose a nasal sound?
Once you are ok with the following, wait before celebrating: did you check everything against the other microphones (overheads, room microphones etc.)? Do it and, if you feel something is again becoming boomy, nasal, muddy, too deep, too thin and generally “not as you want it”, go back and start tweaking things one at the time, while listening to all the microphones.
 Something absolutely brilliant that I would never part from in situations like these, is the Little Labs IPB Phase Alignment Tool, made in plugin form by Universal Audio. This little utility has it all: you can delay and switch polarity but you can also smoothly work your way from 0 (normal polarity) to 180 degrees (reversed polarity). It is amazing what you can achieve by only moving the phase by 10 degrees or something and this goes well beyond anything you could possibly achieve by EQing your tracks.
4 - Learn when to divide and when to unite
Finally, how do you process your drums? Separately, getting the best out of each track? Or as a whole, processing them on their bus? You have to be able to do both and discern when to act on single elements and when to act on the whole. Let your ears tell you where to go.. and to let them do that..you have to train them:
 A great way to do it is to experiment and listen: take for instance a bass drum made of two tracks, one real recording of the inside of the bass drum and an added sample. What are the strong components of each? Let’s say the inside is probably there to give you meat, cardboard-y real “skin vs head” sound and the sample is being used to get that constant, controlled sub and that sharp edge that makes it cut through a busy mix.
- Hipass the lows on the real bass drum..do you feel the sound as a whole is getting deeper, more subby and tighter in the bottom? Or is it getting thinner?
- Scoop the mids on the sample..is the bass drum getting clearer, less masking towards the whole mix and more edgy? Or is it losing body and “upper chest”?
Those are example of single-track processing. Do not be afraid to leave things be if none of the experiments satisfy you. You might be perfectly ok with the bass drum as it is!
Now work on the bass drum bus:
- Boost the hi-mids around 4-5kHz.. does the bass drum gain a bit more edge and character? Or does it become a little too weird and fake?
- Compress the bus with your favorite compressor.. does the bass drum sound more like “together” and coherent? Or does it lose bottom and presence?
With a little experimenting you will begin to understand what you need to do to solve a specific problem in your session. And with time, the more you mix the more you will know what to do in a matter of seconds.
5 - Let’s get practical.
Here is an excerpt from a recording session I've done at Fuseroom. The original session features something like 10 microphones on the drum kit but I deliberately removed all but the inside of the bass drum and the top of the snare. Then I also brought in the overheads and mono room microphone to demonstrate how samples can be great for enhancing... but you can’t beat having real air, real drums and real microphones.
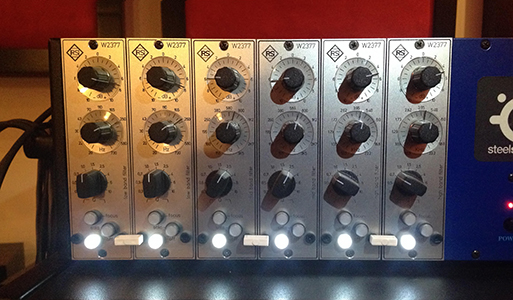
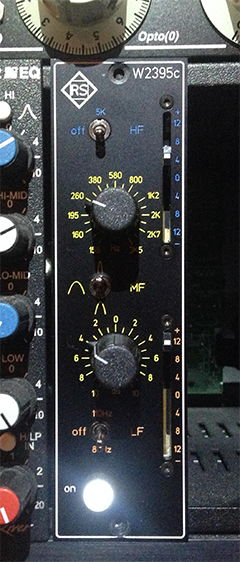
The RS W2377 and W2395 filters used in the last example
The above steps have always helped me to take a sample-addict session to sound “ready” in a way that it wasn’t possible before. Having something that sounds great with no processing on it (or little-to-none) is a fantastic feeling for every sound engineer.. but it is also great for the listener, as nothing beats the natural harmony of multiple parts working together effortlessly. How many times have you stacked plugins on top of each other trying to reach for a specific sound and failing miserably after hours of fiddling? I know I have been there.
If you can reach your desired sound faster and more efficiently, you’ll be happier, your DAW will use less power, the planet will be greener and ultimately, you will have more time to go out and play soccer with your friends!
Alberto.

Alberto Rizzo Schettino is a pianist, synth head, audio engineer and part of the Puremix family since 2013. He is the owner of Fuseroom Recording Studio in Berlin and also works as a product specialist for some of the best brands in high-end audio gear.
Fuseroom Recording Studio: http://www.fuseroom.com
Alberto's Web Site: http://www.albertorizzoschettino.net