
One of the most impressive aspects of any contemporary DAW is its extensive editing capabilities. Anyone old enough to remember physically editing analog tape will especially appreciate digital editing features like cut, copy and paste, audio quantize, track duplication, editing grouped tracks, clip gain adjustments and many others.
In Bayou Ingenue by Puremixer: Mark Conner' Fab uses techniques for editing audio in Pro Tools to tighten up the tracks in the song “Bayou Ingenue” before moving forward with the mix.
Click from the Past
In part 1 of the video, Fab had to make substantive changes to the session to get the song in shape for his mix. The original multitrack was recorded back in 1995 onto a reel-to-reel tape machine. More recently, Mark and his son transferred the tracks to Pro Tools, separated the kick and snare tracks and used them to trigger newer drum sounds for his rough mix.
Despite the replacement drum sounds, Fab felt the song would be better served with a completely new drum track that would make it sound more contemporary from a sonic standpoint. He spoke with the artist and got permission to replace not only the drums but the organ, as well. Multi-instrumentalist par excellence Dave Zerio came into the studio to overdub drums, B3 and some additional percussion.
Before Dave’s session, Fab checked the original tracks against the click and noticed some areas where the band strayed from the grid. Because he needed an accurate click for the overdubs, he manually created a new tempo map for the song in Pro Tools. Doing so is labor-intensive because it requires you to enter each measure’s downbeat manually.
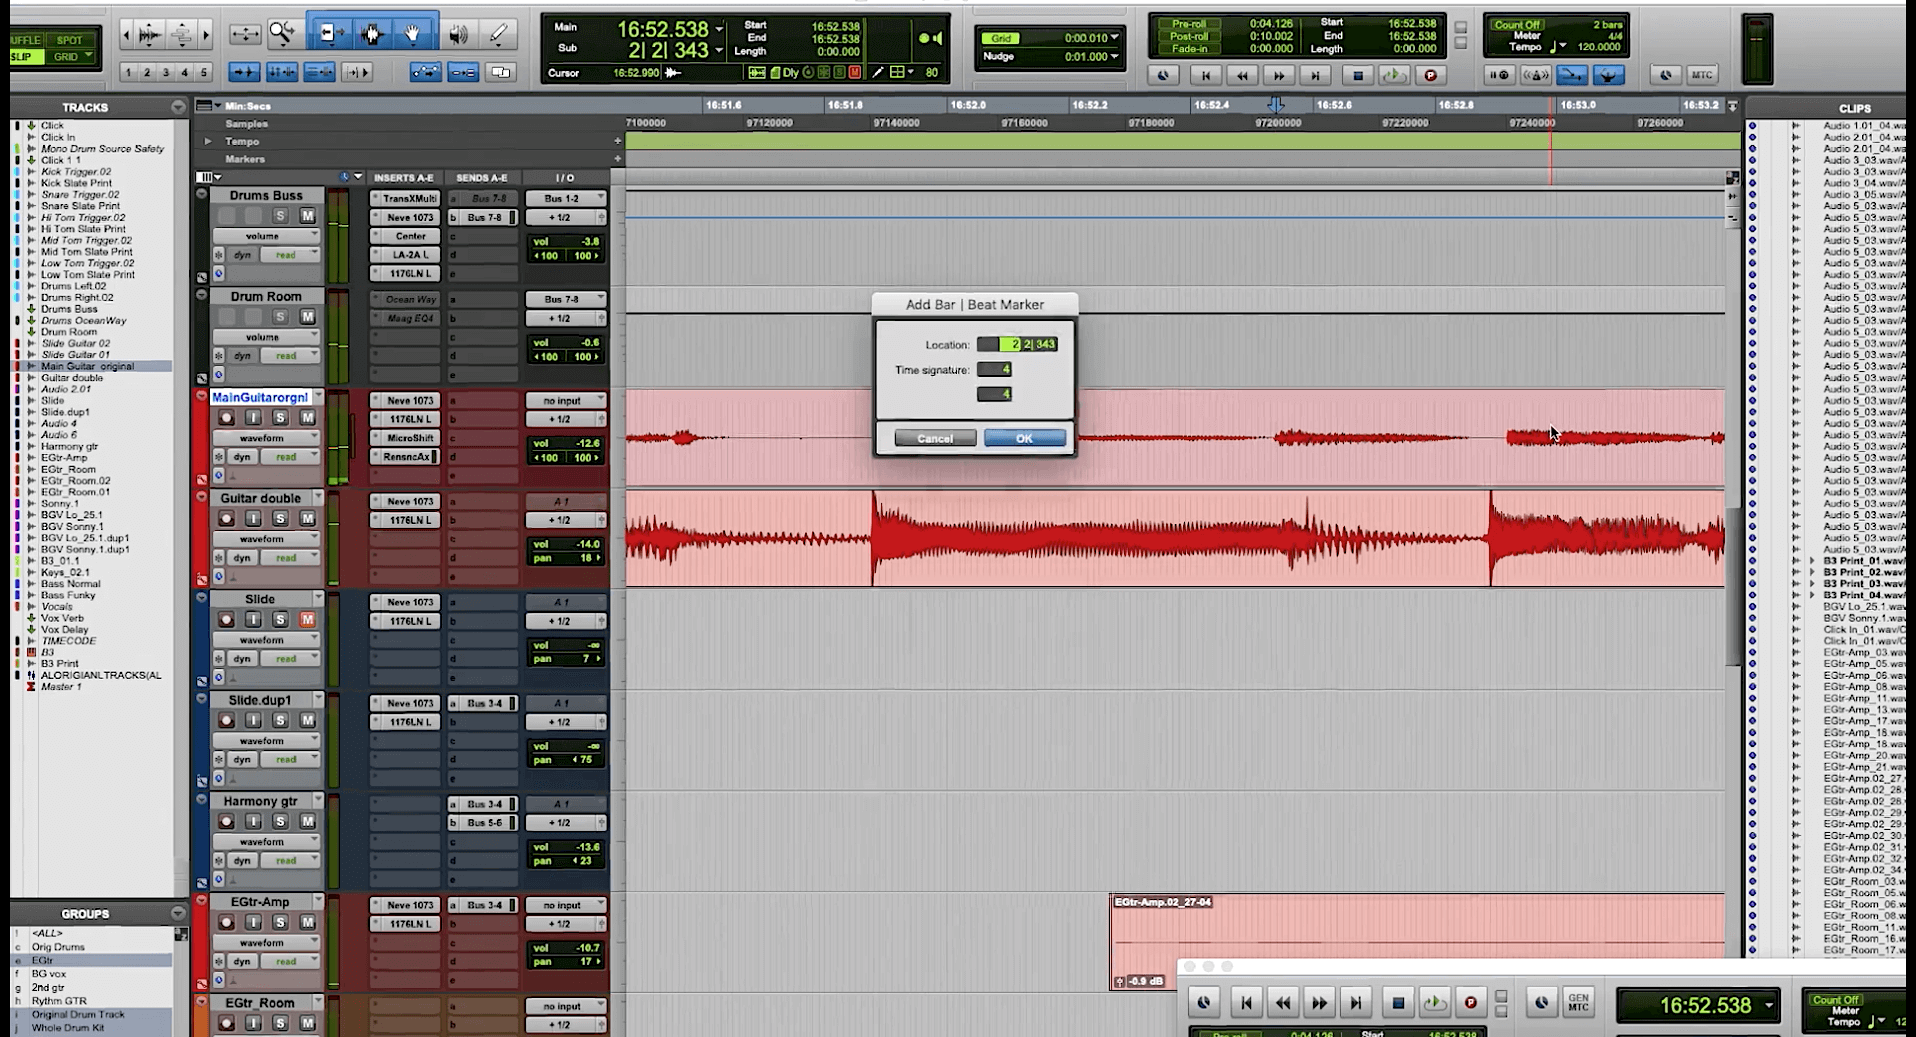
From Part 1 of the series: Fab manually creates a tempo map.
With the new tempo map in place, some tracks still didn’t line up completely, so Fab used Pro Tools’ Elastic Audio feature to time-shift them so that they conformed.
Getting Down to It
The song had two bass tracks that are active in different song sections. One was a conventional fingered electric bass, and the other a slap bass. Working on the latter, Fab started by raising its gain at the Clip Gain level. Clip Gain is pre-fader, so if you’re not getting a healthy enough signal into the channel or if the track was recorded a lot lower than the rest of the audio, raising the Clip Gain can be a helpful tool for balancing it.
Fab also went through the bass parts and found some phrases were a bit rushed, or “a little happy,” as he put it. If something is behind the beat, he calls it “sad.” To fix such timing problems, he split the phrases on either end to make them into separate regions and then manually slid them to where he wanted them to start.
That type of audio editing can be beneficial for tightening up parts. If you want to keep the parts locked into each other and sounding organic, you don’t always want to use audio quantizing, especially across a whole part or long section. If there are only a few notes or phrases with timing issues, you can manually move them closer to the beat. For a single note, it’s easier to leave the grid-snapping off when you cut and move it. Use your ears and eyes to line it up. For phrases and song sections, you want it on.

For cutting single notes that you want to move, it’s usually easier to leave grid snapping off. In Pro Tools, that means switching to Slip mode.
In many DAWs, you can temporarily use a key command to disable grid snapping. In Pro Tools, hold down the Command key (Ctrl on PC) when you make the edit, and it turns off grid snapping until you release the key.
Sections on the Move
Another method Fab used for fixing up the bass tracks was to isolate their parts in the various song sections, find the ones that were played best and copy and paste them over weaker versions from the same section.
When you have a track that’s uneven performance-wise, and your song is played to a click, it’s usually pretty simple to move sections around with copy and paste. If it’s a track with a lot of repetition, like a rhythm guitar or simple keyboard comping part or synth bass line, you can find good instances of specific sections and paste them over any that seem lacking.
Once you’ve identified the song sections you want to copy and paste, switch to Grid mode with the value set to whole notes. Since you’re moving multiple notes, you must keep it conformed to the grid, or the timing of the section you’re pasting will get thrown off. If you’re in a DAW other than Pro Tools, turn on grid snapping and set the value to whole notes.

Keep the grid on and set to bars when you’re copying song sections to paste elsewhere in the song.
Next, cut at the beginning and end of the section. Because the grid is set to whole notes, your DAW will only allow you to cut on a bar line. Once you’ve separated the region, you can option-click (alt-click on PC) to copy it and then drag the copy over the part you want to replace.
You can always switch into Slip mode (grid off) after you paste and extend the section on either end of a note that hangs over the bar line and doesn’t sound right at the transition point.
It’s not always desirable to copy and paste sections of a track that features parts containing different fills or flourishes each time the section comes around. If you do, the listener may start to hear the phrase—which is supposed to be improvised differently each time by the musician—repeating if you paste one instance of it several times. For example, if you have a piano part that plays fills in between vocal lines on every chorus, you wouldn’t want to find the best one and paste it over all the others unless you don’t care if the listeners notice.
Before moving audio around, it’s wise to make a duplicate copy of the session and work on that, keeping the original as a safety.
The Fix is In
In the following audio example, you’ll hear the two-measure ending line of a blues song with some pretty egregious timing errors. In particular, the lead guitar plays the last note late, and the bass rushes the entire line.

The timing issues in the example are highlighted here.
To fix the lead guitar’s late note, you can manually move it into time.
- Put Pro Tools into Slip mode.
- Use Tab to Transient to find the beginning of the note and split it.
- Split the end of the note, as well.
- Manually slide the note to line up with the last beat. (Alternatively, you could use the Quantize function set to Audio Clips to move it.
One way to fix the rushed bass phrase is with Pro Tools’ Elastic Audio.
- Separate the line to be an independent region (Clip).
- Set the track’s Timebase to Ticks.
- Enable Elastic Audio and set its algorithm to Monophonic or Polyphonic.
- Select the section to be quantized.
- Set the Quantize to Elastic Audio Events.
- Set the Quantize value to eighth notes. In this example, the Quantize was set with the Exclude Within parameter at 5% and Strength at 95%. The idea with those settings is to leave alone notes that are close to the grid but significantly quantize the others.
Here’s the example after the editing.

This shows the example after the timing issues were fixed.