Recording drums is among the most challenging of studio tasks. In a commercial studio, the engineer will typically place anywhere from about 8 to 15 mics and sometimes more on the drums. Some of the mics are positioned close, meant to capture specific kit elements. Others are overhead or room mics, meant to provide an image of the full kit and give it some natural space.
Mic placement is critical for getting optimal sounds. You have many positioning choices, so it helps to have an idea in advance of what you’re going for sonically to figure out how to proceed.

You can see some of the mics Jacquire uses on drummer Bryan Garbe’s kit including Audix D6s over the floor tom and rack tom and a Shure SM57 for the hi-hat.
With all those open mics in close proximity, there’s a lot of potential for phase issues, so you need to be careful to check the phase relationships between the mics. For more on how Jacquire handles that, check out this article from the Puremix blog.
In this excerpt from Start to Finish: Jacquire King - Episode 5 - Tweaking The Drums And Bass, Jacquire is adjusting the aim of a Shure SM57 that he’s using as the sole close mic on the snare drum for the tracking session with the band Oak and Ash. Initially, in Episode 1, when he first mic’ed up the kit, Jacquire had aimed the 57 across the snare, angled at about 45 degrees.
But now, he readjusts it to be angled down more sharply and pointing more to the center of the drum to get more attack. He felt like it lacked brightness in the initial position.
Your Aim is True
When mic’ing a snare or tom, the more the mic is aimed at the center of the drum head, where the sticks hit, the more attack you’ll capture. Jacquire’s original mic position was not pointing directly at the center of the head. When he adjusted it, he pointed it more at the center.
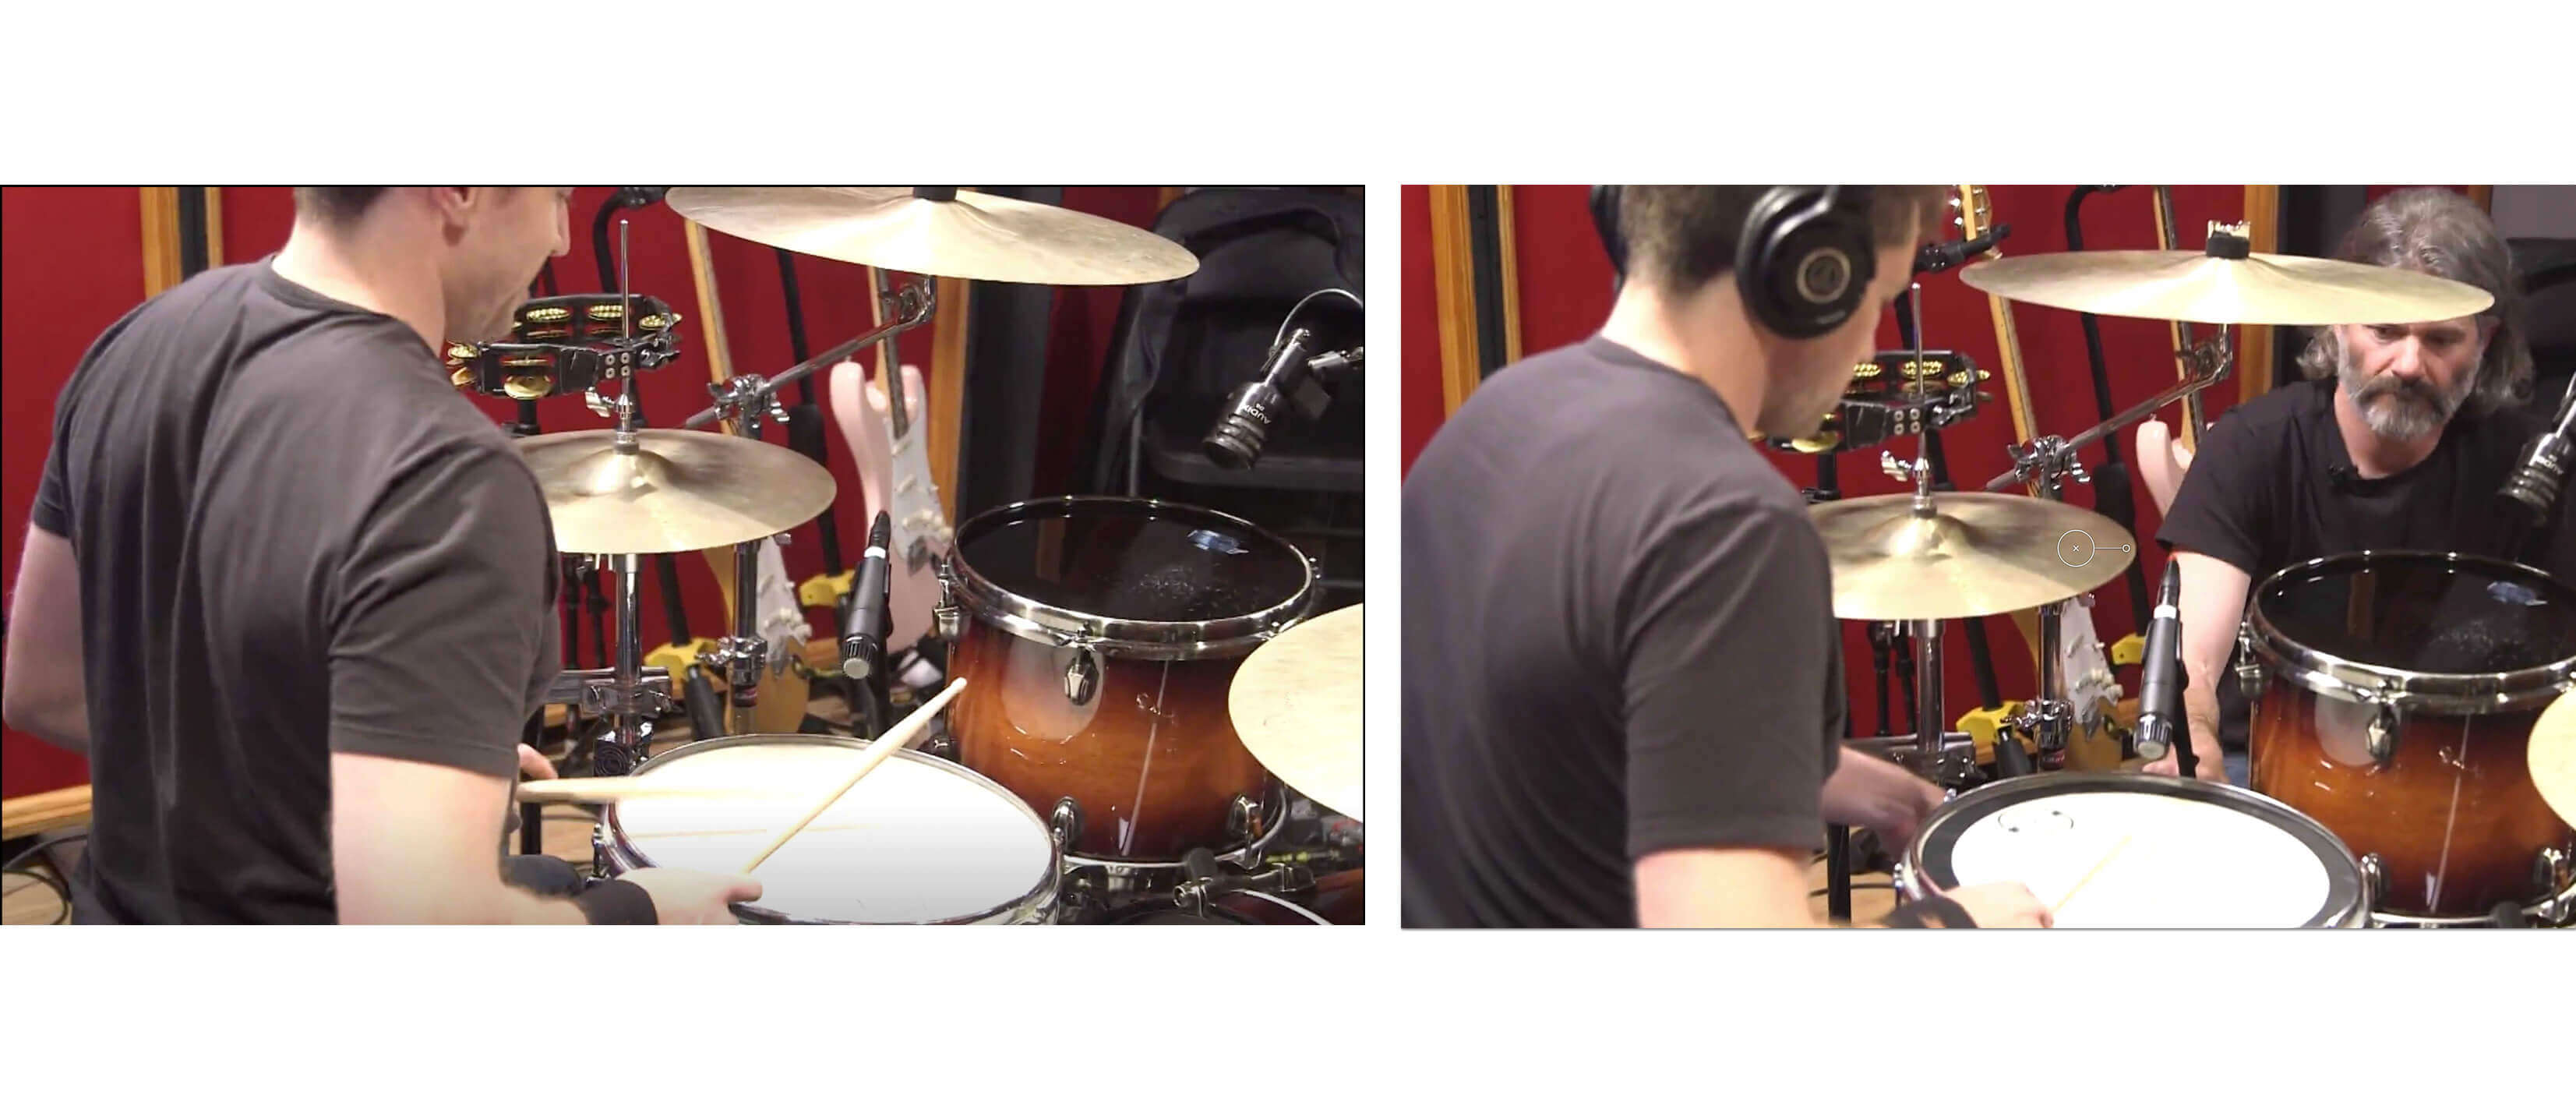
The left is the original positioning of the SM57 on the snare, and the right is the adjusted one.
As with all mic’ing situations, distance is another crucial variable. The closer the mic is to the head, the more low end you’ll get, assuming you’re using a unidirectional mic (cardioid pattern, typically), which is subject to the proximity effect. The further back the mic is, the less lows and more ambient sound it will capture.
The Hits Keep Coming
Let’s listen in isolation to some examples, on snare and tom, to show the impact of mic positioning on the sound. All the examples were captured with an SM57.
In this example, you’ll hear a snare figure repeated twice with a pause in between. The first time the mic was placed just over the edge of the head, 4" up and pointed at the center. For the second figure, the mic was also 4" above the head, but was in about 3" over the head and pointed straight down.
The reason for “cheating” the mic in towards the center of the snare, is that the drum produces fewer overtones the closer you get to the middle of the head. Of course, the closer the mic is to the center of the drum, the more likely it will get hit accidentally by a drum stick.
You’ll also notice more attack in the first figure because the mic was aimed closer to the center.
Here’s an example with a rack tom, which also shows the difference in aiming at the center or the edge of the drum. You’ll hear a tom figure play twice with a pause in between. Both times, an SM57 was placed 3" above the head, cheated in a couple of inches toward the center. The first time the mic is aimed straight down, and the second is angled and pointing at the center, allowing it to capture more attack.
The next example is again on a snare drum. This time, the 57 was pointed at the center and placed in the same spot over the drum's edge. The only difference when the figure repeats is the height. The first is 4" above the drum and the second is 2". Because of the proximity effect, the second figure is more bassy.
The last example is another with a rack tom. For both figures, the mics are positioned just over the edge of the head and pointed to the center. The first time the mic is 5" from the head and the second time 1". Thanks to the proximity effect, the closer one is much beefier.
More to Consider
You have a lot of choices to make when recording a drum kit. Here are some of the issues to consider.
Do you have enough inputs on your interface and mics for a full drum mic’ing setup with overheads, mics on the close drums and perhaps a room mic? If not, you can still get usable drum recordings with smaller configurations, more typically between two and four mics (you could even do a one-mic setup if you place it really carefully). You can find a lot of information about various small-mic’ing setups by searching online.
Do you have appropriate mics? Particularly for the kick drum, it’s best to have a dedicated bass drum mic, such as an AKG D12 (or D112) or similar, designed to capture low end. For the snare, you want a mic that can handle loud sources. As Jacquire demonstrated, an SM57 is an excellent choice. It can take high SPLs, is quite sturdy if it gets knocked into by a drum stick, and is very inexpensive compared to most studio mics.
Dynamics are typically the best snare mics, but you can also use condensers, if they can handle the SPLs. However, they tend to pick up more of the surrounding drums due to their greater sensitivity.
The typical setup for the overheads is a pair of condensers of the same make and model. If you can get a factory “matched” pair, that’s even better. You can use dynamic or condenser mics on the toms. The archetypical tom mic is the Sennheiser MD-421 (which also makes a good snare mic). In the video, Jacquire and engineer Kolton Lee use an Audix D6, designed as a bass drum mic, on the floor tom.

A closeup of the mic position Jacquire uses for the floor tom.
Given a sufficient number of mics and inputs, many engineers use more than one mic on the kick and snare. That’s not the case in the video, where Jacquire uses one mic on each. A typical two-mic setup for snare drum features one aimed at the top head (aka “the batter head”) and the other at the bottom head (aka “the resonant head). The top mic gives you the fullness and attack and the bottom mic captures the snares vibrating.
With two-mic kick drum setups, it’s typical to use one of the mics inside the front head. Either on a bass drum with the front head removed or one that’s designed with a hole in the front head. The second mic would be back a few inches from the front. The idea is the inside mic (often referred to as “kick in”) would pick up the sound of the beater hitting the head and the outside one (“kick out”) would provide more bottom end. In the excerpt, Jacquire used one kick mic, and it was placed just outside the hole in the front head.
The mic position for the AKG D12 kick-drum mic in the session.
Getting Over It
Overhead mics are critical to mic’ing a drum kit. They’re not just for picking up the cymbals; they also provide the stereo image, sometimes in conjunction with stereo room mics. If you listen to well-recorded overheads, they will give you a sonic picture of the entire kit. You can then use the close mics to reinforce that sound.
How you array your stereo overheads is critical. It would take an entire article or more to go over the various stereo mic’ing techniques you can apply, such as XY, ORTF. Blumlein or Mid-Side. They each have their advantages and disadvantages, but all are phase coherent. You can find plenty of information on line about all of the stereo mic'ing techniques.

The XY stereo mic’ing configuration offers phase coherence but a relatively narrow stereo image.
You could also use a spaced pair of overheads. But be careful, as it’s more vulnerable to phase problems because of asymmetrical differences in distance from the various drums. If you go with a spaced pair, make sure to check—before the recording starts—the phase relationships between the two overhead mics with themselves and with the other kit mics.
Also, keep in mind that you want your overheads to give you a blend of the kit and not be too cymbal heavy. So be careful in your placement that the mics aren’t too close to the cymbals, particularly the ride, which can sometimes dominate one side of an overhead pair in a way that makes mixing more difficult.
Bouncing Around
Another issue to consider is your room acoustics. If you’re recording in a room with acoustics that harm rather than help the sound, you want to minimize them as much as you can. Dispense with using room mics and keep your overheads pretty close to the kit. You can always add ambience with plug-ins in the mix, but you can’t get rid of crappy-sounding room reflections that get recorded.
You also have to consider the bleed from other drums and cymbals when positioning your microphones. Even with cardioid pattern mics, which pickup in a narrow range, mainly in front of the capsule, the direction you aim them is crucial. You’re never going to eliminate bleed in your close-mic’d drums completely, but you can reduce it considerably by pointing it away from other kit elements as much as you can.
Another consideration in placing mics is to make sure to leave enough room for the drummer to play. Although you might prefer the sound with the snare and tom mics positioned over the drum head, you don’t want the drummer’s sticks to hit them.
How careful you have to be depends on the drummer. If you’re dealing with a real pro who plays consistently and under control, you can probably cheat a little more in toward the center if it’s necessary to get the sound you want. However, if the drummer is on the wild side and plays unpredictably and haphazardly, you’d better be careful, or you could end up with a damaged mic.
Those are just some of the issues to consider. Before your first drum mic’ing session, it pays to do research (such as watching Puremix videos) and plan carefully so that you’re not making it up as you go along on session day. Putting in the extra time will be well worth it.