If you want to reduce sibilance on a vocal track, the most direct way to accomplish it is with a de-esser plugin. Such plugins combine EQ and dynamics processing to zap sibilance—which typically resides in the 5kHz to 10kHz range—when it occurs.
But, there’s more than one way to deal with those pesky “esses,” as you'll see in this excerpt from Start to Finish: Jimmy Douglass - Episode 12 - Mixing Part 2. In it, Jimmy de-esses the vocal track of singer Jared Evan by using an EQ plugin. Surprisingly, his most consequential adjustment is in the midrange, below the typical sibilance area. Read on to find out how he did it.
A Tale of Three Bands
At the top of the excerpt, Jimmy tells us he's going to de-ess the vocal, but before getting to that, he opens up a Bomb Factory Joemeek VC5, a three-band EQ, which he says he wants to use to add additional thickness and midrange to Jared's chorus vocal. The plugin features three bands, Bass, Mid and Treble. The Bass and Treble controls are fixed at 100Hz and 8kHz, respectively. The VC5 plugin, like the other Bomb Factory Joemeek plugins, is unfortunately no longer available.
Jimmy plays the chorus and starts EQing Jared's vocal. He cuts the treble by about 1dB or so and boosts the bass by less than 2dB. For the mid-band, he sets it to about 1.3kHz and gives it a significant boost of 4dB.

Jimmy’s EQ settings.
After listening to the result, Jimmy says, "Cancel the de-esser. I found another way around it." In other words, the EQ adjustments he made reduced the sibilance to a point where the de-esser wasn't necessary.
So how did that happen? For one thing, the sibilance wasn't too extreme. The Treble band on the VC5 is fixed at 8kHz, which is in the middle of the sibilance frequency range. Although his Treble cut was small, it likely contributed some to lowering the energy of the ess sounds.
But his 4dB midrange boost was the largest adjustment he made. Not only was it below the sibilance range, but so was his more modest bass boost at 100kHz. By changing the vocal tone, particularly with the addition of the mids at 1.3kHz, the sibilance became less prominent. Sometimes, when adjusting one thing, you accidentally fix another.
Although that was a pretty easy fix, de-essing isn't always a simple matter. One thing that worked in Jimmy's favor was that he was working on the chorus section only. He might have had to take some other steps if he was also de-essing the verses. The more instances of sibilance you have to deal with in a vocal track, the less likely one setting will work for them all.
Kick Some Ess
When excessive “ess” sounds are an issue, it makes sense to first try a de-essing plugin and see if it takes care of the problem areas. Begin by setting it to match the approximate sibilant frequency, which will be somewhere between about 5kz-10kHz, depending on the singer's vocal range. On most de-esser plugins, including the Metric Halo Precisin De-Esser, shown below, you get to set a threshold of some type and often attack and release times, just like a compressor. When sibilance exceeds the threshold, the de-esser compresses in the frequency range you’ve set.

The Metric Halo Precision De-Esser.
It sounds very straightforward, but it often isn't. The sibilance in a vocal track won’t always be at the same intensity each time it occurs. As a result, a one-size-fits-all setting may not work. Sometimes you end up having to automate the settings to compensate for the differences.
You also need to set the de-esser carefully, so as not to over-process the vocal. You typically want just enough processing to reduce the sibilance to below where it sounds problematic. If you go too far and take too much energy out of the esses, they'll start sounding like "th" instead .
More Than One
If you only have a few spots in the track that need de-essing, you can also reduce the sibilance at those points by automating clip gain or track volume to dip at the appropriate spots. You'll probably need to draw in the reduction so that it ramps in and out a tiny bit. If you just do a straight vertical line at the beginning and end of the reduction area, it will sound a lot less natural and may even create a click. Ramping in and out is the same concept as adding crossfades to the front and back of an audio edit.
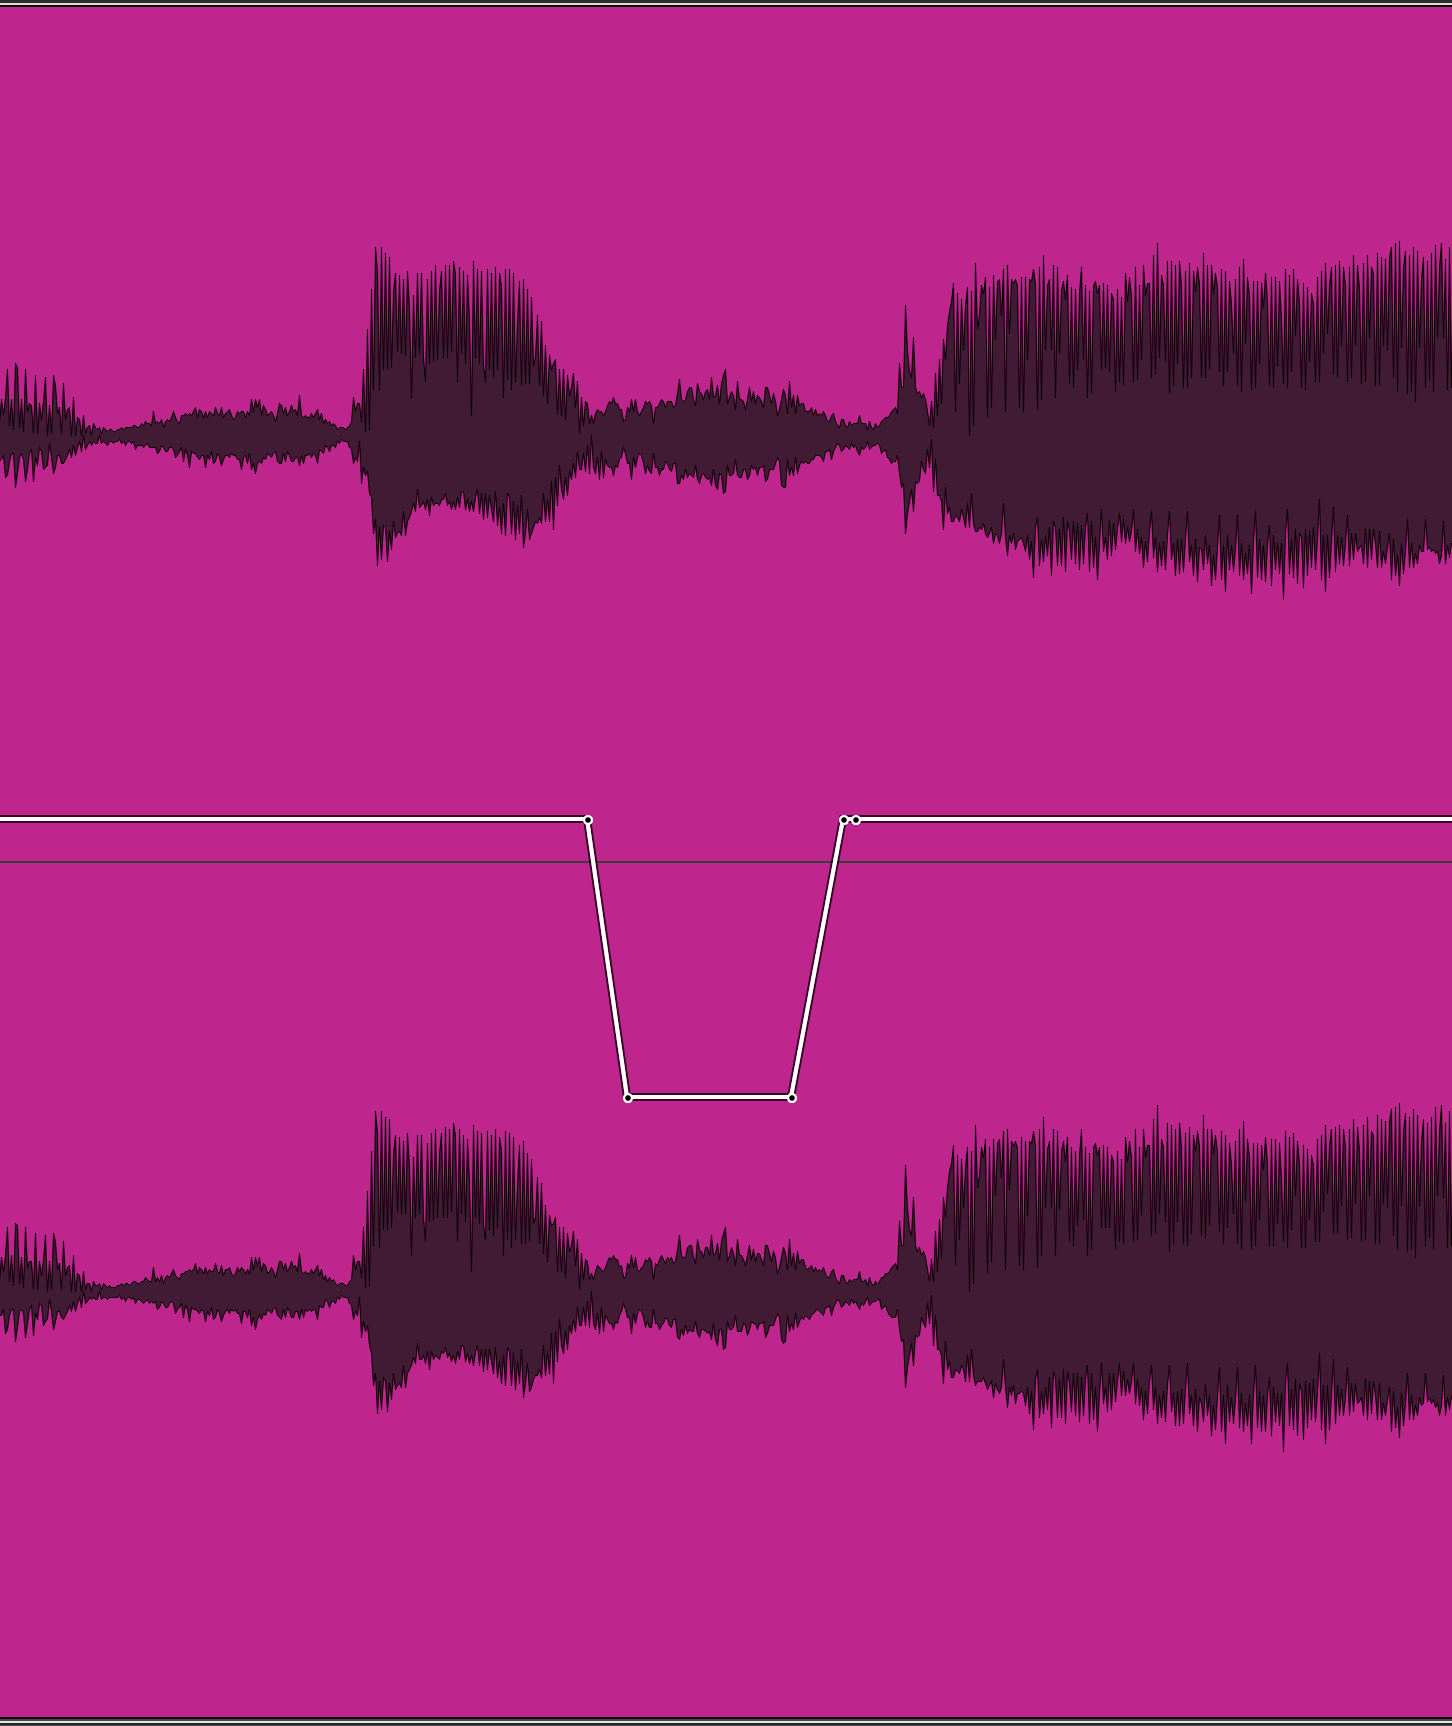
You can make a manual reduction of an ess sound smoother by ramping in and out slightly.
In the following example, you'll first hear a vocal line with sibilance in a couple of spots. When it repeats, you’ll hear the effect of manually de-essing using Pro Tools Clip Gain Line to reduce the level of the problem areas. Focus on the words “stay” and “still,” to hear the sibilance and how it sounds reduced.

You can see where the two ess sounds were reduced in the example.
If you use Melodyne 5 (any version other than Essential), its new sibilance detection and Sibilant Balance Control allow you to graphically edit ess sounds, one occurrence at a time. Sibilance shows up in Melodyne as a part of a blob (note), but it has numerous vertical lines, which makes it obvious which part is sibilant and which tonal.
You can use the Sibilant Balance Tool to reduce the amplitude of the sibilance without lowering the note's volume. If you were to use Melodyne's regular Amplitude tool on the “esses,” you'd need first to separate the sibilant portions from the tonal ones using the Note Separator. That would allow you to change the amplitude of the sibilant sounds without affecting the tonal parts of notes.

The lined areas like the one highlighted in blue are sibilance that Melodyne detected.
The Dynamic Way
A dynamic EQ also works well as a de-esser because it combines EQ and dynamics processing, which is what a dedicated de-esser does. You set a dynamic EQ to reduce a particular frequency range when it rises above an adjustable volume threshold. The most significant difference between a dynamic EQ and a dedicated de-esser is that you have to do a little more of the settings manually for the former. Many dynamic EQs will include de-ess presets, which can get you in the ballpark. You'll want to experiment with the frequency settings a little to try to find where the processor is most effective for the vocal you're working on.

You can also use a dynamic EQ, like this one in iZotope Neutron 3 to reduce sibilance.