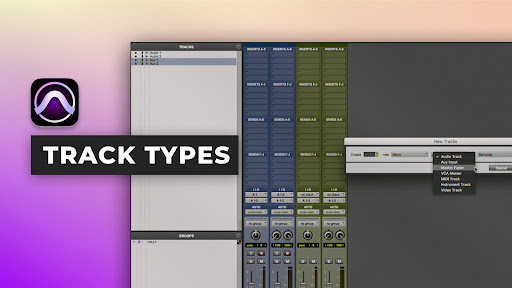
00:00:00 Good morning, children! Today,
we're going to explore new topics
to help you hold your own in
good society conversation
namely: we're going to explore
track types in Pro Tools!
First, let's reflect on the concept
of tracks:
A track in Pro Tools
hmm..
00:00:24 Traditionally a track was
on the recorder, on the tape player,
say your Studer would have 16
or 24 tracks if you have the money.
00:00:33 And then you had a channel
on the console:
a Neve or
- for other people - an SSL.
00:00:39 Or maybe a Trident.
00:00:41 But in Pro Tools
the track is both the track
and
the channel!
So the track that you know is called
a track
let's look to at a track's
a track..
00:00:53 ..that's a track!
This one's mono
and this one's stereo.
For those of you who wonder
how I was able to put tracks in
Pro Tools without touching my mouse
I recommend Shift+Cmd+N
which brings this 'New Track'.
00:01:08 So here's the way to think about it:
In Pro Tools, this is your channel
and here, right here,
is your track.
00:01:15 And it's an all-in-one object
that can play audio
onto its track here and process it
here.
00:01:22 Right now, we're gonna look at the next
track type, which is:
the aux input.
00:01:27 Aux Input, let's make a mono one
and let's make a stereo one.
00:01:32 Boom.
00:01:33 What is the purpose of an aux
channel.
00:01:35 Well, there are many purposes.
00:01:37 One is aux returns.
00:01:39 You can use it for delays and
reverbs.
00:01:41 You can use it for parallel processing
and you can use it to submix
or to sum different channels
for example: say you're a kind soul
and you let your drummer have more
than one tom.
00:01:53 Say they have five toms.
00:01:55 You're not gonna process five toms
separately
because you're not that kind of girl.
00:01:58 What you're gonna do is
you're gonna take these five toms
and sum them down to a stereo channel
that has all five toms summed
together.
00:02:06 You're gonna use an Aux Input
for that.
00:02:08 Here's where people get really
confused with Pro Tools:
people are used to calling these
things a Bus
right? 'Oh, let's bus this down!'
But Pro Tools calls it an Aux Input
and by the way
the channel
icon for the Aux Input is that
little down arrow, here.
00:02:24 So you can tell: this is an Audio Track
and this is an Aux Input.
00:02:27 I understand it's confusing but this
is the way you can think about it:
This is the bus in Pro Tools.
00:02:33 You can see here, you can go
and choose a Bus.
00:02:37 So the bus in Pro Tools is not the
receiving object
the bus in Pro Tools
is the cable.
00:02:43 Ok, think of the busses in Pro Tools
as cables.
00:02:46 And the busses in Pro Tools
let you go from track to track
from track to aux input
and so on and so forth.
00:02:52 And that's a really important
concept.
00:02:54 I'll rewind.
[TAPE REWINDING]
In Pro Tools
a bus is just a connector cable
in-between two objects, it is not
a receiving object.
00:03:04 Next track type
is a master fader
this is another typically
Pro Tools concept.
00:03:10 Remember this guy?
Well, this guy happens to have
a volume knob on it
if you want to and only
if you want to.
00:03:19 I'll show you an example.
00:03:20 Let's imagine that these are
my toms.
00:03:22 Ok?
And let's imagine that this is my
tom submix
so I'm gonna call it:
'Toms Submix'
just so we know what it is.
00:03:32 And then I'm gonna choose a bus
as the input of that aux.
00:03:41 Still with me?
Ok, good.
00:03:43 Now, these are my toms,
Audio 1 and Audio 2
or Tom 1 and Tom 2
and I'm gonna send them to
Bus 1-2.
00:03:48 Meaning, I'm gonna connect
this guy
to the output of these
two objects
and the input of this object.
00:03:58 Consequently now
anything that's playing from
these audio tracks right here
will go through these two objects
and then be fed to the input of this
Aux Input..
00:04:09 ..remember: this guy
who goes between the object
audio track
to the object aux input,
as a connector,
has the ability to have
a volume knob on it
and that volume knob is the
master fader's.
00:04:21 All you have to do is choose
that cable (bus)
as the object that the master
masters.
00:04:30 Quick mid-term summary:
We have the Audio Track object
which is a combination of a tape player
like 'audio player'
and a console channel.
00:04:40 We have the Aux Input object
that is just a console channel,
just a receiver, a summer,
or an aux return,
we have the bus object,
which is invisible,
you can only see by name,
at the output
of a track or the input of a track
or
at the send, right here, of a track
and that is just a cable, just a
connector
in-between two other object types
and then we have the master
object
which is just a volume know
for the bus object
or physical outputs.
00:05:11 Next in line we have the VCA object.
00:05:15 For those of you who were born
yesterday, a VCA
is a Voltage Controlled Amplifier.
00:05:20 What does that mean?
Back in the day.. '70s and '80s
when they had big consoles with
lots of faders
and they wanted to be able to
bring a bunch of faders together
they had to find a way to make that
happen with the technology
at the time. And what they did
is they basically had one fader
physically control the other faders
and that was a VCA. Because it's a very
useful device, they have
adapted this concept to
the DAW environment, even though
obviously
they don't really need to
have a VCA here, because everything
is virtual anyway, but
there are very good uses to a VCA.
00:05:56 A lot of people get confused about the
difference between a VCA
and an Aux.
00:06:01 An Aux Input will pass audio
from the tracks that feed it
2, 5, 100 tracks.
00:06:10 Whereas a VCA is just a fader
remote controller
and also a mute and solo remote
controller for that many tracks.
00:06:17 Next track type
is the MIDI track.
00:06:21 So, the MIDI track in Pro Tools and
any DAW, really,
is an abstraction because there is no
MIDI running in the DAW.
00:06:28 Right? It is
MIDI data, it's
playback data for MIDI instruments
and it will only turn to MIDI if you
feed it out to a physical MIDI interface
and feed it out to an old keyboard
that has MIDI on it
but most of the time you are gonna feed
that to a virtual instrument
because nobody has
hardware keyboards, these days.
00:06:48 Next track type is the Instrument
track type.
00:06:50 That's an interesting one!
What is this object type:
it is a
smart combo of a MIDI object
and an Aux Input object, which means
that you can put
an instrument on there, so for
example,
in good company, so many instruments so
little time, let's do XPand 2
for example, love this thing!
You can put an instrument on that track
but you can also turn it in record
and hit
a keyboard..
00:07:15 and get sound right away.
00:07:16 Before the Instrument object existed
in Pro Tools you had
to have a MIDI object and an Aux
Input object and connect the
MIDI to the Aux Input, up there,
in the Instrument area
and then you could make music.
Now you have this one object
and you're able to put an Instrument
on it
and use it both for the MIDI data
and for the audio data, because you can
still process all this stuff
like, for example, here I could put
like a really nice compressor,
like this.
00:07:45 And hit it:
Give it some attack and then
play some tasteful stuff..
00:07:58 Well, that happened! Ok, so now
the Video track
doesn't show in the audio mixer
you have to switch to
the Arrange window to see it.
00:08:08 And this is where you're gonna drop the
video if you're gonna score to video.
00:08:11 It has lots of interesting features,
it is not a full-featured video editor
but it's very practical
you can drop videos in it, you can
score to video
you can cut it a little bit,
you can move it around,
it can be in frames, it can be
in samples,
there's a lot of things you
can do with it
but it's not a primary focus here,
today, so I'm gonna move back
to the audio side, which is the
interesting side of what we do.
00:08:31 So now that we are acquainted with
all the different objects
let's look at a couple things that
are often overlooked
and what they can do for you.
00:08:38 For example, here:
for me to be able to show you this
resolution
my resolution on the screen is quite
small, which means that
I can't see it all at once.
00:08:47 The beauty here is, this little
window here lets you choose
what you see.
00:08:51 So if we go down to only
five sends
and five inserts, I can now see
everything I am doing.
00:08:57 Another really cool trick that these
tracks can do
is, for example, say I wanna send
my aux..
00:09:03 ..1, to my
toms sub, I'm gonna use
the Bus 1-2, remember:
the bus is just a cable.
00:09:09 And I can choose here what I'll do
with it. But more importantly
in my track I can show
my element like this.
All I do is
Cmd+Click on it and it
opens and closes.
00:09:19 And that's really awesome. So you can
open
and close as many of these as
you want. So you can really have
like a physical console,
a real view of what's going on
without having to go dig inside
which is really
great for mixing quickly.
00:09:33 Here's another cool trick, let's create
another mono audio track.
00:09:36 There you go, Audio 3, I'm gonna put it
with its little brothers and sisters,
right here.
00:09:40 And say I would like to send this
to the toms submix.
00:09:43 I have several options to do that.
00:09:45 Remember, I'm using Bus 1-2
to go from these audio tracks
to this aux track.
00:09:51 I could go here,
select Bus > Bus 1-2
and it's going there.
Now, if I have
a big session with 100
or 150 busses
it's really difficult to find that.
00:10:04 So another way to do this
is to use this track menu, here.
00:10:07 If you go here, you can go down
to "track"
and you can say, I'm gonna send
this track
to the toms submix.
And it looks for the bus
and connects it automatically for you.
And that's really awesome.
00:10:19 Another cool trick is:
imagine that this toms submix
is
the best thing in the universe but
you need to put a reverb on it.
00:10:27 The traditional way of doing this
is
create a new stereo Aux Input,
find a bus that's free, say for example
Bus 3-4,
connect the send to that bus
and connect the input of your reverb
to the same bus, bus 3-4,
call the track 'Reverb'
maybe call the bus 'Reverb' too
because we're grown ups
we name our busses
and then assign a reverb
plug-in on it, something tasteful like
an UAD 250.
00:11:01 Ok, so that's the process.
00:11:03 Now, you can use
this send, you can look at it here, too,
it's pretty!
You can use this send to send this toms
submix to the reverb.
00:11:13 Fair enough.
00:11:14 But say you don't have that kinda
patience and you want to work faster,
here's a cool trick that's fairly
recent in Pro Tools, like
two or three revs ago.
00:11:21 Straight from this aux send I can click
here and say 'New Track'
I can decide that this new track is
an Aux Input and it's
stereo and I'm gonna call it:
'Quick
Reverb'.
00:11:31 And Pro Tools will create
an Aux Input,
create a bus,
name it 'Quick Reverb', connect the
output of the send to the bus,
connect the input of the track
to the bus, name the track
and then all you have to do is put
a reverb on it:
boom!
And that's a lot more efficient.
00:11:51 Another cool thing that tracks can do
is I/O Inserts.
00:11:55 And this is really important if you work
with a big Pro Tools rig
and you have hardware.
00:11:59 You could use your Manleys,
your Dangerous
as inserts as plug-ins,
all you have to do is, here
in Insert,
use the I/O function, and what it does
is it looks for a pair of outputs
and a pair of inputs
that are matched, so for example
say I have my..
00:12:17 ..my Dangerous Liaison with my
entire rig here, on
I/O 3-4
and say I want to insert that on my
toms submix.
00:12:25 I'm gonna go to my inserts
and I'm gonna I/O 3-4.
00:12:30 Pro Tools is gonna take the signal, is
gonna go through the aux input,
it's gonna hit this insert,
it will send the audio from this
aux input
to Output 3-4 of your interface.
00:12:40 You will do what you wanna do with
your Liaison and all your little,
pretty processing..
00:12:45 ..and you will connect that back to
Input 3-4
and then Pro Tools will take that
input,
delay compensate it, perfectly
phase accurate,
and feed it back to the rest of
the stack, right here.
00:12:54 And that is wonderful!
It also works on masters, by the way.
00:12:59 For those of you who are still
scratching their hands on the VCA thing,
let me show you:
Say,
we're gonna
get all the stuff that we don't need
out of the way
and
make them inactive.
00:13:10 By the way you can hide these
tracks
like this, and they're still here
but they're just
no longer visible, you can
decide if they're visible here
or not.
00:13:20 Most of the time, when I am
in the mixer view
I keep this window open, because that
gives me an idea of
everything that's available
including the inactive tracks.
00:13:27 The inactive tracks give you DSP back
and your CPU back
so you don't have to worry about that.
00:13:32 You don't have to hide them
but since I am a little bit OCD on
the sides
I like to hide stuff I don't use.
00:13:38 These are my 3 toms, let's them name
'Tom..'
because I am not OCD.
00:13:44 'Tom 2',
'Tom 3'.
00:13:47 Good.
00:13:48 And these three toms are going through
my tom
submix aux object.
00:13:54 Of course since I am not OCD
I'm gonna rename the bus,
remember: just the cable,
'Tom
Submix'
and you can do that by right-clicking
on the bus
and you can rename it, you can make the
bus inactive and you can do a
whole bunch of stuff,
here, which is
not for this video, it's gonna get too
complicated but this is
the basics you know to be able to
function in Pro Tools.
00:14:17 So now these three toms are being
submixed
through an aux object, which means the
audio of the three toms
is going through
the aux object. So if you take this
down, obviously,
the sound of the three toms
is gonna come down
in concert, and if you put an EQ here,
like this,
this is a good EQ,
and you do this, all three toms,
because they go through this object,
will get the boost and EQ.
00:14:44 What if I wanna be able to change
the volumes of these three toms
together
before it hits the object.
00:14:52 What you would do is: you would
create a group
like this, Cmd+G,
and call it say something very
specific like: 'Tom..
00:15:01 ..s' and
give it a good letter, I tend to try and
give it like
the same letter as the instrument, so
'T' for tom.
00:15:09 Boom.
00:15:10 So now these move together.
00:15:12 If you wanna move just one of the
group
there's a clutch system which is
a life saver!
With your pinkie you hit Control
and then you can move one fader
and offset
the range in-between the three
tom faders or whatever faders
you have.
00:15:26 It also works for kazoo faders!
Why would you need a VCA?
Well, say for example you had
100 faders.
00:15:34 You could assign the VCA to that group
'Toms' and now you can change
all the toms levels, you can solo
all the toms
and you can mute all the toms from
this one object, right here.
00:15:46 What I do is, I call it:
little 'v'
Toms.
00:15:50 Imagine, you have 200 tracks.
00:15:52 And you have one VCA for drums,
one VCA for
all basses, one VCA for all guitars,
one VCA for all
keyboards, one VCA for all vocals
and one VCA for all the kazoos.
00:16:02 You keep all those VCAs to the right
of your session
or to the left, depending on your
political leaning
and now you have your entire control
over the whole session
with just the VCAs without having to
look at 100 tracks.
00:16:13 But!
It's different from
an Aux
that is submixing a bunch of those
tracks.
00:16:20 Remember that!
With the VCAs you can actually
change how hard
a group of tracks is hitting an aux,
right?
Or less hard
so, for example, you could use a VCA
of all your drums
to lower all the drums proportionally
before they hit 2-bus compression.
00:16:36 All this to say that the
object track types
in Pro Tools are incredibly
flexible
and let you do just about anything
you want
which makes the strength of the software
for example: say you wanna print
this submix.
00:16:51 You can do it offline and say
commit, or you could do it manually
just for a little moment
in time and say: create a new track
make that an audio track
and call it 'Tom Sub Print'
and now this aux
object is being routed automatically
through a new bus
automatically created for you
to this new track which you can put
in record
and you can record into it
so it's really kinda like a
tinkertoy,
build-your-own-mixer if you want to
with enough automatism that you don't
have to go crazy.
00:17:27 The ability to clutch groups,
the ability to route from anything
to anything,
the ability to choose
VCAs on the fly, change them,
to VCA VCAs, to VCA masters,
to have masters and all that stuff
and being able to arrange it the
way you want
is so strong that it makes using
other DAWs
quite complicated after that and there's
a lot of chasing after
these features in other DAWs.
00:17:49 So it is very interesting to learn
Pro Tools to be able to
figure out this workflow
so that when you go back to your regular
DAW you can use these techniques
to ease up the workflow and go to
a more
traditional,
better workflow, better gain stage
in all the DAWs.
00:18:05 Meaning:
when you have a track here,
in this view,
you have a track here, in this
view,
and if the track is here in this view,
it is also here, in this view.
00:18:15 And, if you move this track from
here
to here, in this view,
guess what?!
It's moved to there, in this
view!
Isn't that wonderful? That, my friends,
is the pure genius of Pro Tools.
00:18:26
Once logged in, you will be able to read all the transcripts jump around in the video.
Fab Dupont is a award-winning NYC based record producer, mixing/mastering engineer and co-founder of pureMix.net.
Fab has been playing, writing, producing and mixing music both live and in studios all over the world. He's worked in cities like Paris, Boston, Brussels, Stockholm, London and New York just to name a few.
He has his own studio called FLUX Studios in the East Village of New York City.
Fab has received many accolades around the world, including wins at the Victoires de la Musique, South African Music awards, Pan African Music Awards, US independent music awards. He also has received Latin Grammy nominations and has worked on many Latin Grammy and Grammy-nominated albums.
Thank you !! Fab !! really good explanation for more understanding, for biginners like me
donaldlaw
2018 Feb 23
Another amazing video ... many thanks, Fab!
Joven35
2018 Feb 22
Thank you! Very informative. Keep up the great work!
composermikeglaser
2018 Feb 22
Awesomely broken down, thanks Fab!
moda
2018 Feb 22
Thanks, Fab! This is a life saver for beginners like me. But there's 1 thing you didn't talk about that's driving me crazy: solo save and pre/post fader stuff. I don't get it and once I create Busses and stuff I tend to lose overview of how I can solo/mute different tracks. I know it's a "D'Oh" kind a thing for pros but for idiots like me that stuff is annoying as heck. A short video on that would be killer
rickdrumss
2018 Feb 21
many thanks Fab. It helps me a lot!!
Pearlpassionstudio
2018 Feb 21
Hi Fab... That was a greatly explained tutorial. Thanks